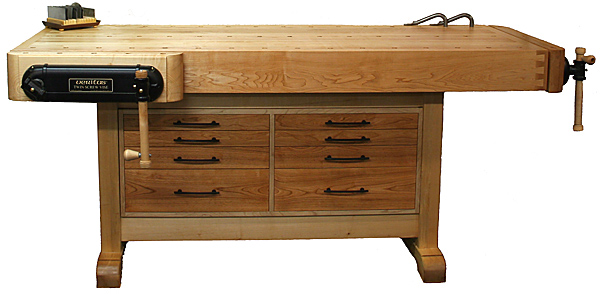
The Twin Twin Bench (2005)
I'm not sure if I should call this the "Quad Screw Bench" or the "Twin Twin Bench".......

Links to more pictures:
Construction is all 8/4 hard maple with the exception of the cherry wedges for the through mortises and cherry dowels for the draw bored mortises. Finish is Watco Danish Oil.
Top is roughly 28" x 76" x 2-1/4". Apron is 5-7/8". Vise jaws are 3" thick with thumbnail profiles to match the trestle base feet. Front and end vises are Veritas Twin Screws. The corners of the aprons are joined with hand-cut half-blind dovetails. A Delta 18-36 drum sander got the top close to flat, and various hand planes finished the job. All dog holes are round. The top is attached to the trestle base with two lag bolts - one on each side.
This bench is a close reproduction of Lon Schleining's bench from FWW 167, with the major exception being I used a second Twin Screw vise for the front vise. A storage cabinet will be added in the base at some point in the future.
Update 5/23/2006:
I finally finished the cabinet for inside the trestle base of my bench.
The cabinet carcase is baltic birch ply banded with maple. The drawer boxes are leftover sappy cherry boards dovetailed at all corners with the D4 jig. The drawer fronts are cherry and applied over the boxes to cover the full extension slides. The finish is danish oil, and while the cherry is a bit pale now it will darken in no time for further contrast.
The two top drawers are 2-3/8" tall, the next is 3-1/4", and the bottom drawer is 6-1/2" tall. Each drawer box is about 22" x 18". They hold a great amount of "stuff", and the cabinet provides even more weight to an already massive bench.
I integrated the new pics of the bench with the cabinet into the main section above.
Update 5/23/2006:
I was recently asked for general advice about bench construction. I managed to ramble off these pointers based solely on my experience with this bench. I thought I'd save them here in case anyone else might find it useful (I know it's a long shot...).
- Use published "plans" as guidelines, but make the bench yours to fit your needs. Don't be afraid to change just about anything. Lon's bench is the foundation of mine, but there are many things that are different - some big stuff (front vise, dog hole style, o'all dimensions, top position on the trestle, etc) and some minor stuff (won't list those...).
- Read all you can about benches before you start. Schleining's book, the Taunton Workbench book, all the mag articles you can dig up, web sites, etc. The more you understand your options the better design choices you'll make.
- The slab is heavy and difficult to work with. Careful lumber prep and glue-ups will save TONS of time in flattening, cutting the end tenons, etc.
- Face joint your slab lumber. Why people skip this is beyond me - it's one of the single most important glue-ups you'll ever do, so use all the proper techniques.
- Choose wood you're happy with. I got some "bargain basement" maple that isn't exactly picture-perfect in many ways. It works fine, but it's one of the few things I'd do differently.
- Don't skimp on budget if you can manage it. I really wanted to spend less for this bench, and I put off building it for many years because of its cost. Now that it's done I'm extremely happy I put the cash into the high dollar vises and hard maple and .....
- The trestle construction was a blast. I loved doing the draw-bored and wedged tenons. Keeping the trestle SQUARE (dead nuts bang on square) is critically important.
- I struggled to keep the dog holes perpendicular to the top. I tried several methods and ended up choosing to drill through a guide block with a LV 3/4" brad point bit. Probabaly 95% of the holes are fine, but there are a few I wish I could do over. Do your first holes on the back row (which sees the least use) to get your technique down.
- Take your time. This is one project you don't want to rush because if it's not done properly it will affect every future project you build.
- Mass is a very good thing. Forget all about 4/4 stock unless you want to do some serious laminating.
- Let your lumber acclimate to your shop for a good long time (and them some more time for good measure) so that it's not moving on you as you're building.
Update 11/11/2007:
Once in a while I need to show pictures of how I utilize various features of my bench. So I quickly assembled a new page with a few pictures that demonstrate some of the ways I've used the bench. I'll try to add pics as I'm able to show a bit of it's flexibility and power. Click HERE to see the new "Twin Twin Bench Usage" page.
© Copyright 2007 Chris Billman